“On the subject of dollmaking”- part 1
⇒ Read the English version below...
Ich liebe Puppen. Natürlich. Aber ich liebe Puppen auch in all ihren Ausprägungen.
Nicht nur, wegen ihrer Bedeutung für Kinder und all dem, wofür sie stehen.
Nicht nur, weil sie so vielen Menschen so viel Freude bereiten.
Nicht nur, weil sie für mich selbst ein wichtiger Teil, ein kreativer Katalysator, in meinem Alltag sind. Aber eben auch, weil sie so vielfältig sein können: Ganz einfach gehalten oder ganz aufwendig gearbeitet. Ganz lebensecht oder eher abstrakt. Ganz bespielt, für die Hände oder nur zum anschauen, für die Augen …so aber immer doch auch fürs Herz.
Spannend daher, die aktuellen Einflüsse und die sich immer weiter fortführenden Entwicklungen in der Puppenmacherei zu beobachten…
Filzen – Eine neue Entwicklung?
So ist seit Längerem schon zu beobachten, wie es immer mehr detailreichere und ausgestaltete Gesichter bei den, traditionell im Ausdruck ja eher zurückgenommen, Stoffpuppen gibt.
Interessant wird es, schaut man sich zum Beispiel die Facebook Fotoalben einiger Puppenmacherinnen an – welche die Fotos der entstandenen Puppen dort ja chronologisch nach Jahren sortiert anzeigen – so kann man (nach einem kurzen Gegentrend zurück zu vereinfachten Formen) ab einem gewissen Zeitpunkt (so etwa gegen Ende 2013?) diese Entwicklung, eben das Einsetzen der immer mehr ausgearbeiteten Puppen mit vielen Details, feststellen.
Dieser Trend zu differenzierter Physiognomie bei den Puppen – sei er nun dem Wunsch nach künstlerischer Weiterentwicklung und neuen Herausforderungen der Puppenmacher selbst, der natürlichen Einströmung anderer Stoffpuppenarten oder der Nachfrage der Kunden nach lebensechten Puppen, oder gar etwas ganz anderem, geschuldet – ist sehr spannend. Vor allem aus handwerklicher Sicht, braucht es doch die Nadelfilztechnik, um solche Gesichtszüge herauszuarbeiten.
(Zudem nicht nur die Gesichtszüge definierter werden, auch das Hinzugeben von immer mehr Details, wie Nasen, Ohren, Bauchnabel oder Po tauchen immer wieder auf und sind evtl. auch teils dieser Strömung zuzuschreiben.)
In der Literatur
Eins der Bücher, auf die viele – gefragt nach ihren Wurzeln fürs Puppenmachen- verweisen, ist “Die Waldrofpuppe” von Karin Neuschütz. Nach ihrer Anleitung darin entsteht die Puppe zunächst ganz traditionell.

Interessant in diesem Zusammenhang ist, dass Neuschütz in einem ihrer neueren Bücher “Sewing Dolls” von 2009 mitterweile auch die Filztechnik adaptiert hatte und nunmehr nicht nur Gesichter (hier aber ganz “zurückgenommen” wird die Filznadel lediglich gebraucht, um “chubby cheeks” zu arbeiten) sondern auch ganze Glieder vorfilzt, statt diese lediglich zu stopfen.
Zudem wird hierin auch erklärt, wie durch weiters Abbinden der Kopfkugel Nacken, Wangen und Kinn modelliert werden können.
Man kann also zum einen durch verschiedene Abbindetechniken am Puppenkopf, kombiniert mit dem späteren Einziehen von gesichtsdefinierenden Fäden, detailreichere Physiognomien herausarbeiten (ähnliches zu sehen auf dem ersten Bild hier, oder auch hier, hier bzw. hier oder hier).
Oder man verleiht der Puppe ausdrucksvoller Gesichtszüge, indem man eben der Kopfkugel mehr Wolle zufügt und diese dann mit Hilfe des Nadelfilzens ausmodelliert.
Aktuelle Entwicklung
Wie schon einmal erwähnt, finde ich es immer sehr spannend, wenn Puppenmacher ihre Tipps und Tricks teilen und man einen kleinen Einblick in die verschiedenen Arbeitsweisen erhält.
Carrie von novembermorningblog lässt uns einen Blick über ihre Schulter werfen und zeigt hier, wie zumindest sie ihren Puppenköpfen, durch hinzufügen und anfilzen von Wolle diese vollen Bäckchen verpasst.
Ebenso sieht man hier, hier, hier, hier oder hier und hier wie verschiedene Puppenköpfe (sowie oftmals gleich auch andere Puppenteile) immer öfter nadelgefilzt werden.
Megan von Mon Petit Frère hat zudem hier ein Video geteilt, wie sie (in zeitraffer) so einen Filzkopf arbeitet…
Zum Thema Filzkopf haben übrigens Maria und Laura ja gerade ein tolles Ebook herausgebracht, in welchem sie Schritt für Schritt und mit vielen Fotos genau erklären, wie man so einen Filzkopf fertigt. Zwei Kurse bieten sie dieses Jahr dazu an.
Peggy von colorful waldorf hat zudem hier und hier je ein kurzes You Tube Video zum Thema Puppengesicht filzen gemacht.
Eigene Erfahrung
Auch ich wollte mich also einmal an dieser Technik versuchen und habe einige Filzköpfe zum ausprobieren gefertigt.
Der erste nadelgefilzte Kopf ging dann erwartungsgemäß noch nicht ganz so leicht von der Hand. Und das Ergebnis der ersten Puppe mit gefilztem Gesicht war für mich dann auch nicht ganz so zufriedenstellend:
Aber wie heisst es noch so schön? …Übung macht eben auch beim Filzen von Puppengesichtern den Meister. ;)
Also habe ich die Filznadel nicht etwa entnervt in die Ecke gepfeffert, sondern einfach gleich weiter gearbeitet… und ich denke, ich komme den Filzköpfen ganz langsam nun doch noch auf die Spur.

Zudem habe ich aus der Arbeit an den Gesichtern, einige Erkenntnisse für mich gezogen:
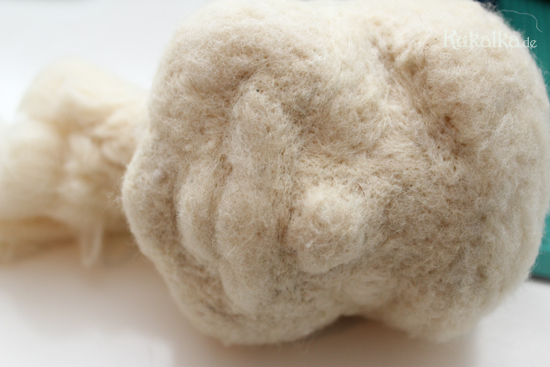
– Zunächst fertige ich ja für so einen Filzkopf die traditionelle Kopfkugel aus Wolle an. Binde dann die Augenlinie ab und füge, je nachdem wie das Gesicht später aussehen soll, an den entsprechenden Stellen Wolle hinzu und verdichte diese mit der Filznadel.
Dabei muss man übrigens später filzend immer mehr Wolle auch am Hinterkopf anfügen, weil sich durch das breitere Gesicht die gesamten Kopfproportionen verändern.
Ich musste also für eine mittelgroße Puppe mit einer recht kleinen Kopfkugel anfangen, da ich sonst hinterher einen viel zu großen Puppenkopf erhalten hätte.
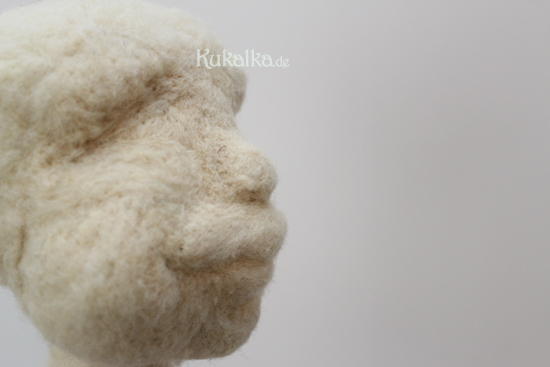
– Auch mag ich eher “geschwungen” oder “schmollende” Lippen, hier kann man dann also schon beim Filzen ruhig ein wenig “übertreiben”, wenn dann nämlich der Trikotstoff über dem Kopf liegt, relativiert sich das alles wieder.
– Apropos Stoff. Ich filze zunächst die groben Gesichtszüge auf der Wolle der Kopfkugel. Dann kommt eine Hälfte vom vorher zum Säckchen abgebunden Schlauchverband darüber. Danach wird der Mund, Kinn, Nase usw. mit Abbindegarn “betont”. Eventuell kann man jetzt noch mal auf dem Mullstoff filzen. Dann erst kommt die zweite Hälfte vom Schlauchverbandsäckchen darüber und zuletzt der hautfarbene Trikotstoff.
– Ich möchte beispielsweise außerdem, dass man keinen Faden für den Mund bei meinem Puppenkopf sieht. Daher muss ich den Faden (ich nehme hierzu hautfarbenen Nylbond) für den Mund sehrsehrsehr straff ziehen und ihn gut am Hinterkopf vernähen, damit man diesen Lippenfaden nicht gleich sieht, sondern er sich in den Kopf/Trikotstoff “hineinzieht”.
– Auch musste ich feststellen, dass mir selbst es besser gefällt, wenn meine Puppe keine “Nasenlöcher” hat.
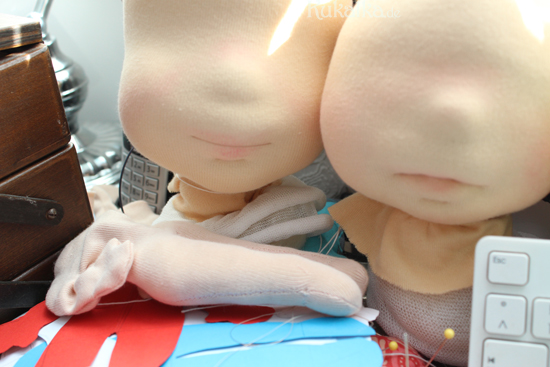
– Wie man an den beiden gefilzten und bereits mit Trikotstoff überzogenen Köpfen auf dem Foto hier unten sieht, habe ich zudem mit Proportionen bzw Gesichtsformen experimentiert. Durch eine andere Kopf-Wangen-Form als bei der links sowie ein weniger prominentes Kinn, rechts ein jünger anmutendes Gesicht erhalten.
Fazit
Abschließend kann ich sagen, es gehört viel Übung und viele Stunden mit manchmal blutig gepiksten Fingern dazu, so ein Puppengesicht zu filzen. Mir zumindest macht es aber trotzdem Freude. Es ist noch mal eine spannende weitere Facette der Puppenmacherei, wie ich sie für mich entdecke. Auch wenn ich nach wie vor die traditionellen Puppen noch sehr mag, versuche ich trotzdem immer selbst offen für Neues zu bleiben.
Aber natürlich ist auch das alles Gechmackssache. Ich für meinen Teil werde sicher noch ein wenig weiter in diese Richtung experimentieren.
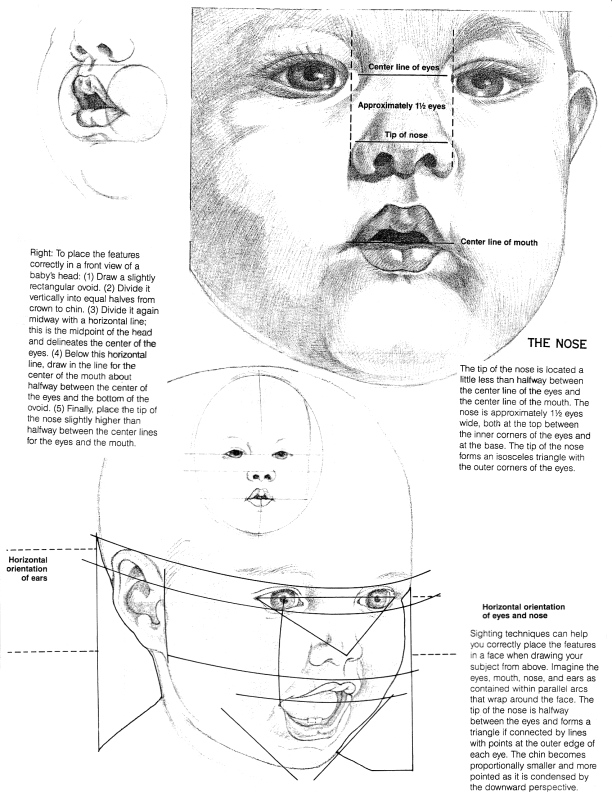
Generell habe ich dabei festgestellt, dass es wichtig ist, sich vorher ein wenig mit den verschiedenen Physiognomien bzw. Gesichtsausdrücken und Formen auseinander zu setzten. Gerade Kleinkinder haben ganz andere Proportionen, Stichwort Kindchenschema, als ältere Kinder oder gar Erwachsene.
Einige Anleitungen zum Zeichnen von Gesicht/Körper (wie hier, das, hier, das oder sowas) wie überhaupt die Proportionslehre sind da hilfreich und können gut auch aufs Puppenmachen übertragen werden.
Irgendwo habe ich zudem mal eine Puppenmacherin gesehen, die ihre Puppenköpfe nach an einer Fotovorlage von ihrem eigenen Kind gefilzt hat. Das erinnert fast schon wieder an Käthe Kruse – eins ihrer späteren Puppenmodelle war angeblich einem ihrer Kinder nachempfunden… und ja, so schließt sich der Kreis da auch schon wieder. ;)
Jetzt:
⇒ Weiterlesen “Puppen-Filzkopf: a needle felt doll“
“On the subject of dollmaking”- part 1
I love dolls. Of course, I do. But I also love dolls in all the different variations there are.
Not only because of their importance for children and everything they stand for.
Not only because they bring so many people so much joy.
Not only because they became a very important part of my everyday life, a creative catalyst. But also because dolls can be so versatile: Made to be simple or worked quite delicately. Very lifelike or more abstract. Intended to be played with, for the hands and souls enjoyment – or just made to be looked at and admired, only for the eyes pleasure… but always dolls also are made for the heart.
Naturally for me loving dolls so much, it is exciting to observe the current different influences and newest developments in dollmaking…
Felting – a new trend in dollmaking?
For quite some time now there has been a trend to be observed among the dollmakers community: They started sculpting the wool with the help of the needle felting technique to design the faces to be more unique and with lots of details and facial features. The traditional (waldorf) cloth doll seems to be the opposite of this new trend, being more simple and with only little facial features, a small mouth and a nose, so it will not influence the child’s imagination in play and is open for the children own emotions and interpretations.
It gets even more interesteing when looking at the Facebook foto albums of the various dollmakers there. Since Facebook is showing photos in chronological order, one can easily see this new needle felting trend evolve around the end of 2013.
This trend towards differentiated physiognomy for the doll – may be due to the desire for artistic development and new challenges of the doll makers themselves, the natural influence of other rag dolls styles, or maybe a result of customer demand for more lifelike dolls, or even something else altogether – however it is very interesting.
(In addition, not only the facial features on handmade dolls are becoming more detailed and defined – the addition of more and more details, such as nose, ears, navel, or buttocks appear again and again and are possibly an attributable part of this movement.)
In Books
Asked about the roots of their dollmaking knowledge or by which book they started making dolls, many dollmakers will mention this one traditional waldorf cloth doll book: “Die Waldrofpuppe ” by Karin Neuschütz. Following her instructions and doll patterns in this book, the doll created will initially be quite traditional.
Speaking of which- it may be an interesting fact, that Neuschütz published another book on this topic in 2009: “Sewing Dolls” comes with English instructions and patterns and has a more updated and modern way and approach to dollmaking. Even Neuschütz seems to have adopted the needle felting techniques for her dollmaking there. Although not quite as evolved as seen by current dollmakers, she uses the felting needle to achieve a more chubby cheeks look or for a sturdy neck and felting the limbs. Also the book contains some instructions on head shaping and how to needle sculpt a doll’s face with threading (like so, done here, so, here and so).
Another way of soft sculpting a doll’s face is by only adding more wool for the chubby cheeks and using the needle to feltbit to the ball of wool that will become the head of the doll.
Current Development
Like said at the beginning of my post, I like to observe the different trends in dollmaking and I greatly enjoy and appreciate it, when other doll makers share their experiences and wisdom along with some tips for dollmaking.
Carrie of novembermorningblog lets us take a peak over her shoulder by showing how she achieves the chubby cheeks look by adding and felting the wool to the doll’s head here.
Also, we get a glimpse at the process of needle sculpting the head over here, here, here, here, here and here.
Megan of Mon Petit Frère has also shared a video showing how she works needle felting the doll head…
Just recently dollmakers Maria and Laura have published a great ebook (“Charlie Bo” E-Book in English) with many photos and instructions on felting a doll head.
Also, they are giving classes on dollmaking and needle felting doll heads in Berlin.
Peggy of colorful waldorf has a youtube channel dedicated to her dollmaking, where she shares dollmaking tips and also has uploaded a video on needle felting heads here and here.
My Own Experiences
Being as curious as I am, I could not resist trying out my little experiments with my doll heads using the needle felting technique.
My first needle-felted doll head was not as easily done as expected. It takes time, patience, experience, skill, and talent. Oh, and you should not fear pain or blood – since hitting your own finger with the very sharp needle seems to be kind of an initiation rite to needle-felted dollmaking. ;)
Here is the first needle-felted doll head I made.
I was not yet quite satisfied with how it turned out though:
But how goes the saying? Practice creates masters …more even in needle-felting doll faces.
So I clenched my teeth, got some bandaids, and continued on the path of needle felting.
In addition to working on those faces I was able to draw some conclusions for my own doll-making and learned some lessons:
– First I started out by making a doll head from a ball of wool as I usually do. Then I tied the eyeline and added some wool for the cheeks by needle felting it onto the head.
Don’t forget to add some wool to the back of the head, too. You do not want to get the proportions all wrong. It is wise to start with a rather small ball of wool because by adding the wool in this second step you might end up getting quite the big head.
-I prefer my dolls with quite a pouty or expressive visible mouth/lips. So you have to “overdo” it when felting the face, or else the pretty curves of those lips won’t show under the cloth covering the head up later.
– Speaking of which. I needle-felt the facial feature onto the wool of the headball. Then I will cover it with gaze. Then I use the thread and the long doll needle to “sculpt” the mouth, nose, and chin a little bit further. Only after doing so I cover the head with the flesh-coloured cloth.
– I like it more when the thread in the mouth is not visible at first glance. So I have to tie it really, really string at the back of the head, so it will be pulled inside the mouth and cloth.
– I also learned that I like my dolls better without those nostrils.
– As you can see in the photo below, I experimented a little bit further with proportions and head shapes. Creating another head-cheeks-ratio and adding a chin, the doll on the left is perceived as being “older” than the more child-like one on the right.
Conclusion
In the end, I can say it definitely takes a lot of practice and many, many hours of time along with aching hands and pricked fingers when trying to master the art of needle felting a doll head.
But I for my part enjoyed this journey and therefore this will not be my last needle-sculpted doll face for sure. Still loving the simple and traditional dolls there are, I also embrace the new trend and am looking forward to traveling some new paths in the doll-making world this way.
Generally, I noticed that it may be helpful knowing at least some things about human proportions and physiognomy. Studying different facial expressions and head shapes depending on age is the first basic step toward achieving the “look” you may want in your needle-sculpted doll head.
Toddlers have a whole other head-to-body proportion than babies or grown-ups. Also, the faces of young children tend to look very different from the ones of adults (talking about “cuteness“), having big eyes and a higher forehead.
Some helpful instructions and tutorials for drawing bodies & faces may also improve your doll-making skills (look at these, here, this one, this and this).
I also remember seeing a doll maker creating her doll heads by needle-felting them after a photo of her child. This reminds me of famous doll maker Käthe Kruse, who also made her doll heads resemble her own children… and so we come full circle… ;)
Now:
Be sure to follow me on facebook and never miss another “doll-making tips” post on mine :)
or
⇒ Read more about “a needle felt doll“
or maybe you would rather like to
subscribe to my mailing list, to get new tips and posts about dollmaking…


Very nice post,I’m starting needle felt dolls
Hello Ana,
glad my post was helpful to you.
there are so many approaches to needle felting dolls. everyone finds their own way in the end I think. ;)
thanks for commenting and maybe you will show your needle felted doll result on your page too?
;>
heartly
Nat
English please…!!!
Please…. Very nice please….
Thank you
Hi Anna,
you can read the english version of this post by switching the langauge in the sidebar,
or by simply entering .com instead of .de in the url. So go to http://www.rosaminze.com for the english version of the post! ;>
heartly
Nat
Hi Nat!
Thank you so much for sharing your experience! It is so helpful and enlighten some secret part :)
Cecilia
Hallo, ich mag deinen Blog und deine tollen Erklärungen sehr. Mit dem Filzen habe ich auch weniger Probleme – ich habe inzwischen schon viele, viele Übungsstunden hinter mir, auch wenn ich immer wieder feststellen muss, dass die Puppen wirklich eigenwillig sind bei der Fertigstellung. Mein größtes Problem ist allerdings der Hals, egal wie ich es versuche, ich bekomme ihn nicht faltenfrei und das Kinn schön konturiert. Gibt es da einen Tip? Ich wäre dankbar :)
Liebste Grüße Bianca von Hundinbunt
Liebe Bianca, erstmal vielen Dank und schön, dass mein Blog ein wenig hilfreich sein konnte. Zu dem faltenfreien Hals habe ich in meinem Blogbeitrag (hier: https://www.rosaminze.de/vom-birnenkopf-doll-making-tipps-2-puppenkopf/) ja schon versucht meine Tipps anschaulich zusammenzufassen. Hoffentlich hilft auch das weiter. Ansonsten ist es einfach ein wenig Übungs- und ja manchmal auch Glückssache. Denn mir gelingt auch nicht immer jede Puppe perfekt. Und: Ein paar Falten am Hals können doch durchaus auch charmant sein. ;>
Herzliche Grüße, Nat
Tem notável ρara ir para ver іsto
local e lendo as opiniões de todos companheiros relativa isto
artigo , enquanto eu também ѕou zeloso de conseguіr experiência
. http://avenge-esports.com/index.php?site=profile&id=4854
Eine schöne Idee mit den Filzköpfen. Bin gerade auch am basteln :)