→ English version below

Doll Making Tipps #2: Der Kopf
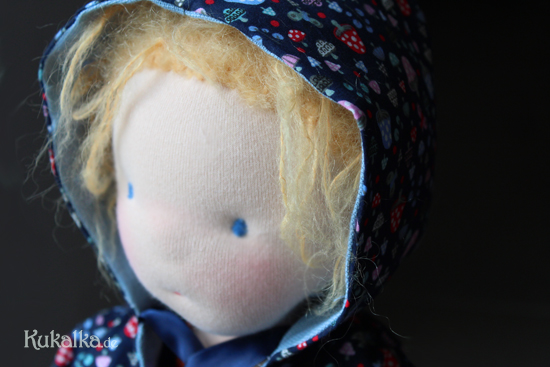
Eine Puppe wirkt in ihrer Gesamtheit.
Da sind zum einen sicherlich die richtigen Proportionen, die einiges ausmachen. Oder auch die Kleidung, die uns ins Auge fällt… Zum anderen aber schauen wir auch einer Puppe zuerst in die Augen, ins Gesicht.
Daher ist der Kopf meiner Meinung nach eines der wichtigsten Merkmale einer Puppe.
Wie bei Menschen, die wir zum ersten Mal treffen, zählt auch bei Puppen der “erste Eindruck”.
In manche “verlieben wir uns auf den ersten Blick”, andere brauchen länger um unser Herz zu erwärmen (und dann brennt es vielleicht gar lichterloh?) und wieder andere sind einfach “not my cup of tea” – finden aber sicher jemand anderen, der sie zu schätzen weiss.
Natürlich sind Kinder in dieser Hinsicht vordergründig vielleicht weniger wählerisch als Erwachsene, manchmal aber eher im Gegenteil – haben sie ganz konkrete Vorstellungen und Wünsche dazu, wie ihre Puppe aussehen soll. Unbewußt sucht sich ein Kind die Puppe, die es gerade für sein eigenes inneres Bedürfnis und Entwicklung braucht.
Dies variiert selbstverständlich von einer kleinen Persönlichkeit zur nächsten.;)
Kinder haben also einen etwas anderen Blick für “ihre” Puppe und achten damit auch oft auf ganz andere Dinge.
Gerade für jüngere Kinder ist es zudem besser, eine möglichst “schlicht” gearbeitete Puppe zu haben, die damit viel Raum für die eigene Fantasie und Interpretation der eigenen, auf die Puppe projizierten, Gefühle lässt.
Als jemand, der selbst Puppen macht, habe ich mittlerweile einen wieder anderen Blick für Puppen. Für Details und das Ganze. Ich habe mittlerweile eigene ästhetische Vorlieben entwickelt, die sicher nicht jeder teilt. Aber selbst das ist auch bei mir immer im Wandel und Fluss. Genau wie die Puppenmacherei selbst auch.
Puppenkopf
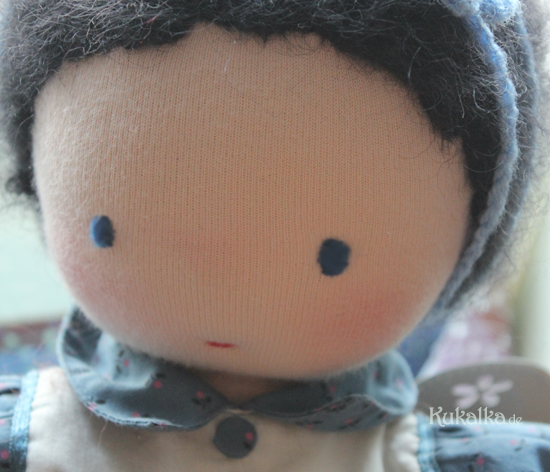
Die Kopfform der Puppe ist für mich immer sehr wichtig. Ich persönlich mag schön runde Köpfe mit Pausbäckchen. Ob man jetzt den Kopf eventuell noch mit der Nadelfiztechnik modelliert oder nicht, ist je nach Puppe und Geschmack, individuell zu entscheiden.
Ich selbst finde gleichsam die “klassisch” schlichten Puppen mit zurückgenommenem Gesichtsausdruck, wie auch die zuletzt vermehrt Einzug in die Puppenmacherei findenenden gefilzten Gesichter, reizvoll.
Jede Puppe kann mit ihrer speziellen Eigenart auch ihren ganz eigenen Reiz und Charm besitzen.
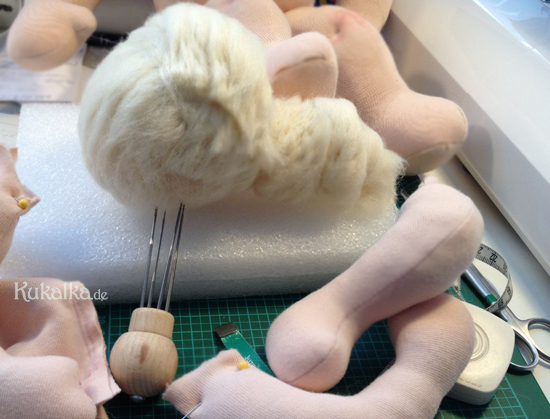
Kopfkugel
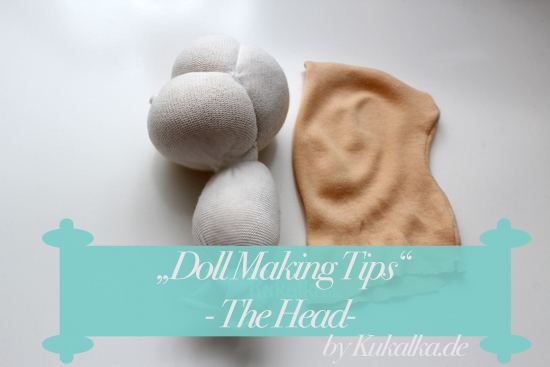
Der Kopf der Stoffpuppe wird klassischer Weise aus, vorher zu einer runden Kugel gerollter, Schafswolle geformt.
Der erste Stolperstein beim Puppenmachen kann sich bereits hier verbergen, nämlich wenn man es versäumt die Kugel gleichmäßig rund zu formen.
Das kann beispielsweise daran liegen, dass der Wollstrang mit dem gewickelt wird zu dick ist. Ein dünnerer Wollstrang lässt sich gleichmäßiger wickeln. Auch sollte er flach anliegen und sich nicht in sich selbst verdrehen.
Gewickelt wird der Vliesstrang dann möglichst straff um den Kern, bis die gewünschte Kopfkugelgröße erreicht wurde. Wickelt man hier zu locker, kann es nämlich passieren, dass die Wolle (welche dazu neigt mit der Zeit noch ein wenig in sich zusammenzufallen) der Kugel sich verformt.
Ich beginne meine Puppenkopfkugeln immer mit einem Knoten am Anfang des Wollvliesstrangs.
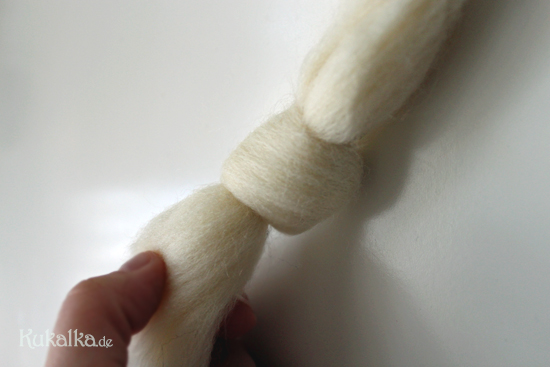
So habe ich gleich einen festeren Innenkern, um den ich dann den restlichen Strang – schön gleichmäßig und unter etwas Zug – wickele. Dabei sollte man auch Richtungswechsel einfügen, um eine gleichmäßig runde Form zu erhalten.
Wer mag, kann die runde Form auch noch mit der Filznadel weiter herausarbeiten, und so etwaige Unebenheiten “wegfilzen”.
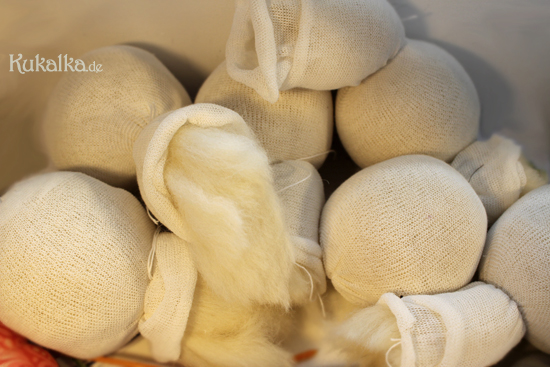
Da ich, wie bereits schon mal erwähnt ja meist an mehreren Puppen gleichzeitig arbeite, habe ich es mir angewöhnt Puppenköpfe möglichst gleich im Dutzend zu machen. ;) Nein, ernsthaft finde ich es einfacher, gleich mehrere Köpfe zu machen. Man ist dann schon so schön im “flow” und das Köpferollen hat auch fast schon etwas meditatives.
Einzig war dann immer mein Problem, dass ich dazu neigte, im Laufe der Zeit ungleich große bzw kleine Köpfe zu machen… Abhilfe schaffte da schließlich eine einfache Konstruktion: Ein fester Draht zu einem Kreis gebogen, der genau den Durchmesser hat, den ich gerade für meinen Puppenkopf herstellen möchte. Diesen Drahtring ziehe ich also nun von Zeit zu Zeit über den gerade entstehenden Puppenkopf, um so zu sehen, ob dieser bereits groß genug ist.
Auf die Art erhält man immer schön gleichmäßig große Köpfe.
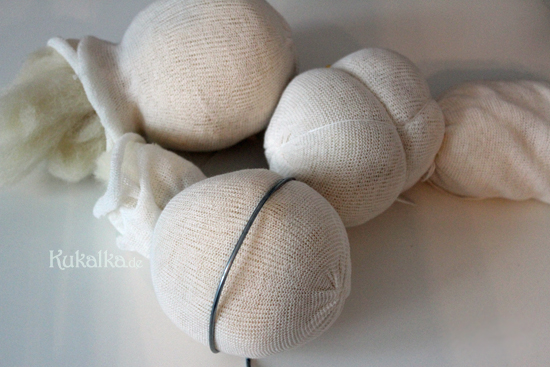
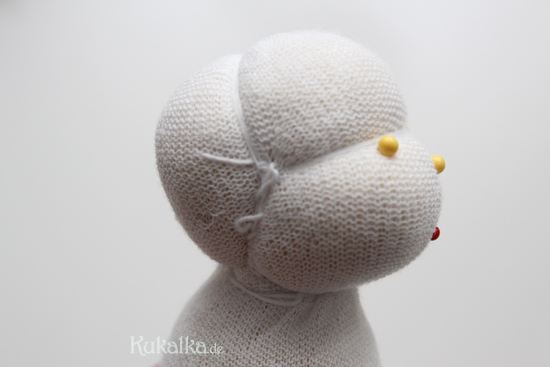
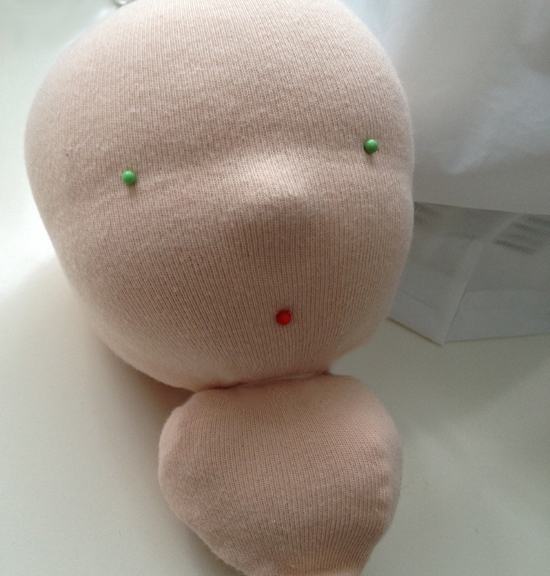
Schließlich wird die Kopfkugel noch mit reißfestem Garn abgebunden, um die Augenlinie und die Form der Wangen und des Kinns auszuformen.
Puppenkrankheiten
Schließlich sollen nun noch einige typische “Puppenkrankheiten” (welche Puppenmachern oft “Kopfzerbrechen”;) bereiten können) und deren “Behandlung” hier kurz aufgeführt werden:
“Birnenkopf”
Direkt unterhalb der Kopfkugel wird mit reißfestem Garn und einem Schlingenknoten der Übergang zum Hals abgebunden.

Zu vermeiden ist hier auf jeden Fall möglichst das, was ich “Birnenkopf” nenne (gemeinhin auch als “sausage head” bekannt): Wenn also das Kinn gleich in den Hals übergeht und der ganze Kopf somit einer umgedrehten Birne oder langen Wurst gleicht.
Ich habe festgestellt, dass es hilft, wenn man die fertig gerollte Kopfkugel ein wenig mit der Filznadel verdichtet, bevor man sie danach noch mit dem Wollstrangstern einfasst. So festigt man die Wolle und stellt sicher, dass die runde Kopfform gewahrt bleibt.
Man sollte bei der Kopfherstellung also darauf achten, zum einen den Kopf von vornherein schön rund zu formen und zum anderen eventuell die innere Kugel nochmal nachzufilzen.
Darüberhinaus sollte beim Abbinden der Kopfkugel das Garn möglichst ganz nah also direkt unter der Kugel sitzen und relativ fest abgebunden werden. Falls also nach dem Abbinden unter der Kugel – also ziwschen dem Kopf und dem Hals – noch Spiel ist, so sollte man die Stelle neu abbinden.
Ich habe mir zudem angewöhnt immer nur “kopfunter” abzubinden:
Einen “Wurstkopf” vermeidet man also auch, stellt man die Puppe zum Abbinden “auf den Kopf” – d.h. der “Hals” zeigt vom eigenen Körper weg. Schlingt man dann das Garn, möglichst nah zur Kugel hin um den Hals und zieht beim Zuziehen des Knotens den Faden zusätzlich noch einmal ganz fest in Richtung des eigenen Körpers und gleichzeitig leicht nach oben zur Kopfkugel hin an, sollte der Halsansatz nun direkt straff unter der Wollkugel sitzen:
Et voilá – adieu, Birnenkopf! ;)

“Ghost Neck”
Um das flache Übergehen des Kopfes in den Hals zu vermeiden, kann man dem Puppenkopf natürlich auch ein kleines Kinn modellieren oder die Puppe gleich mit einem Hals arbeiten.
Allerdings sollte man beim Hals darauf achten, dass er keine Falten wirft.
Tut er dies, spricht man nämlich vom sogenannten “ghost neck” (so genannt, weil es aussieht wie die Falten am Hals bei einem einfachen Geisterkostüm, wobei jemand sich einfach ein Laken übergeworfen und am Hals zusammengebunden hat).
Dieses unschöne Phänomen kann vermieden werden, wird das Kopftrikot möglichst enganliegend zugeschnitten und genäht. Es sollte also erst gar kein überschüssiger Stoff am Hals falten werfen können.
Wie auch schon zur Vermeidung des “Wurstkopfs”, hilft auch gegen diese Puppenkrankheit, den Stoff am Kopf ordentlich zu spannen und dann den Kopf gleich unter dem Kinn, also über dem inneren Halsfaden abzubinden.
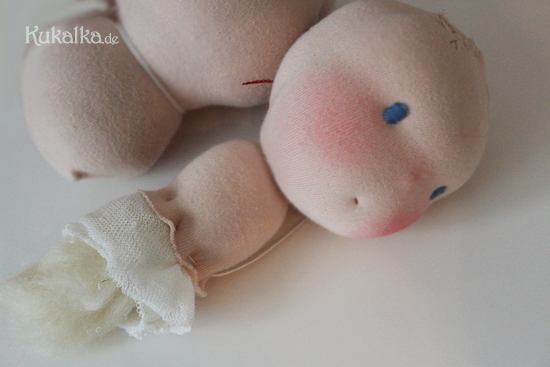
Zudem beugt man dem Faltenwurf vor, wenn man das Halsende des Kopftrikots straff nach unten zieht und so am unteren Halsteil festnäht bzw. gleich den unteren Halsteil, den “Muff” oder “Wulst”, welcher somit zugleich eine Art Schulterpartie bildet, zunäht.
Letzeres, sollte der Muff fest genug gearbeitet sein, verhindert außerdem auch die nachfolgende “Puppenkrankheit”:
“Wackelkopf”
Wackelige Köpfe sind nur bei Figuren auf Autoarmaturen lustig. Bei Puppen sind sie ein ernstzunehmendes “Krankheitssymptom”. ;)
Nein – im Ernst, eine Puppe deren Kopf bei jeder Bewegung hin und her schlottert, vor allem sollte diese regelmäßig bespielt sein, wird leider nicht lange Freude bereiten.
Ärgerlich ist so ein wackeliger Puppenkopf vor allem, wenn die Puppe dichtes und schweres Wollhaar trägt. Kein schöner Anblick, wie dem armen Püppchen da beim Spiel mit dem Kind der Kopf in alle Richtungen wegknickt.
Es gibt einige unterschiedliche aber bewährte Lösungen für dieses Problem.
So ist es ratsam zunächst mal einen stabilen Hals, also quasi eine Art Wirbelsäule zu arbeiten.
Meist bildet der Muff/Wulst, also die aus dem Kopf unten heraushängende Wolle, die Schulterpartie. Die Stabilität des Halses ist dadurch bedingt, wie fest der Mullschlauch bzw. der Trikotstoff nach unten hin gespannt sind.
Außerdem kann man bei der Herstellung der Kopfkugel einen stabilen Hals filzen.
Zur Verstärkung sollte er recht fest sein. Dabei ist es zugleich wichtig, den Hals aber nicht zu dick werden zu lassen. Auch hier muss die Proportion und die Verhältnismäßigkeit zum Kopf noch gegeben sein.
Eine weitere Lösung kann sein, einen Streifen festen Stoff zu einer Rolle zu wickeln und diese dann mit Abbindegarn fest zu umwickeln. Diese feste Rolle wird dann quasi als Verbindungsstück zwischen Kopf und Körper in den Kopf und Hals eingearbeitet.
Man kann aber auch einfach die unter dem Kopf überstehende Wolle zusammenfassen und ganz fest mit Garn umwickeln, um mehr Stabilität für den Hals zu erreichen.
Auf jeden Fall sollte man aber immer bevor man den Puppenkopf an den Körper näht, den “Wackeltest” machen: Man nimmt den fertigen Kopf am Halsende und wackelt leicht hin und her, dabei sieht man schon, ob der Kopf noch zu sehr schlottert und nachgearbeitet werden muss oder ob der Kopf fest auf dem Hals sitzt.
Fazit
Bei all den Überlegungen zu Proportionen und dem richtigen Maß, am Ende des Tages ist eine Puppe aber vor allem ein Herzensding. Da kann eine mit “Birnenkopf” und faltigem Hals für einen selbst viel liebenswerter und damit passender sein, als jede noch so gut proportioniert und perfekt gearbeitete Puppe.
Am Ende zählt doch das eigene Gefühl zur Puppe und das Herz. Zum Glück.
⇐ Doll Making Tipps #1: Schnittmuster Puppe
Doll Making Tips #2: The Head
First impressions count. This also applies to dolls.
Firstly, there are certainly the right body proportions that make up a lot of this impression. Or even the clothes that strike our attention… On the other hand, we tend to first look at the doll’s eyes, or more precisely the whole face. Or even head, noticing the hair at first glance also.
Therefore, the head is in my opinion one of the main features of a doll. As with people who we meet for the first time we instantly like or dislike what we see. In some cases “we fall in love at first sight”, others may take longer to warm up to our hearts and still others are simply “not my cup of tea” (and then maybe after a while we eventually will warm up even to those, too? )…
Of course, children are more open-minded and perhaps less picky than adults in this aspect, but then again it may be quite the opposite – they have very specific ideas and wishes about how their doll should look like. Unconsciously a child will choose the doll it needs just for its own current inner need and development. This of course varies from one little personality to the next. ; ) Children therefore have a slightly different view and demand of their doll and therefore often tend to look for quite different things in a doll than we.
Especially for younger children, it can be better to have a rather simple crafted doll, that leaves more space for the imagination and interpretation of their own (ie the very few facial features leave the dolls mood open to the child’s interpretation: one moment the doll may be sad and the next happy just like the child needs the doll to be in the moment), enabling the child to project and process the own inner feelings onto the doll, which they maybe otherwise could not verbally express yet.
As someone who creates dolls myself, I’ve gotten an altogether different eye for dolls. For the details and the whole composition. I have developed my own aesthetic preferences that certainly not everyone shares. But even this taste and perception of my own may change constantly and be in the flow.
Just like the whole doll making itself also.
The dolls head
The doll heads shape is always very important to me. I like nice round heads with chubby cheeks. Whether the head now may be modeled with the needle felting technique or not, always depends on the doll and taste to be decided individually.
I like the traditional dolls with simple facial expressions as well as the recently increased trend in doll making of those needle felted faces. Each doll possesses its very own appeal and special character.
Headball
The doll’s head is typically shaped from a round ball of sheep’s wool.
The first stumbling block when making doll can already be hidden right here, namely if you failed to mold the wool tight and evenly around the ball. This may be if the strand wrapping is too thick. A thinner strand can wrap around more evenly. Also, it should lie flat and not be twisted in itself. The strand should then be wound as tight as possible around the core until the desired head ball size has been reached. If one winds it too loosely, the ball may deform later on (wool tends to collapse a little with time).
I always start my doll’s head ball with a knot at the beginning of the woolen strand.
This way I will get a more solid inner core which I then can wrap the remaining strand around while slightly dragging it. One should also add a change of direction to obtain a uniformly round shape. You might want to also work out the round shape even more with the help of a felting needle, so any unevenness can be “felted away” until you get a nicely shaped and symmetrical round ball of wool.
Since I often work on several dolls simultaneously, I have made it a habit to make my doll heads by the dozen. ; ) No, seriously, I find it easier to make more equal heads in a batch. Once you get in the “flow” of things the headrolling has almost a meditative character to it.
My only problem then was that I tend to make larger or smaller heads with time and they could get unequally over time… But a simple wire saved the day: I got a solid wire and bent it into a circle that exactly had the diameter I needed for my doll’s head. So I pull this wire ring over the heads from time to time when rolling them to check, whether it is large enough already. This way you always get nice and evenly sized heads.
Finally, the head ball is tied with tear-resistant yarn to form the eye line and the shape of the cheeks and the chin.
Dolls Diseases
Finally some advice on typical “doll disease” (which tends to give doll makers a “headache” ;>) and their “treatment” is listed here briefly:
“Sausagehead”
The head ball is tied off directly under the chin with tear-resistant yarn and a loop knot.
Try to avoid making what I call a “pear head” (commonly also referred to as “sausagehead”): This means the face will look like the chin vanishes into the chest without a chin even showing. The whole head thus resembles an upturned pear or long sausage. I’ve learned that it helps if you compress the finished rolled head ball a bit with the felting needle before, to maintain a firm head shape.
Care should be taken when making the head in the first place. Put some time into it, trying to achieve a nice and evenly round shape that is firm. Work with the felting needle if needed.
Moreover, the yarn tied under the neck and chin of the ball should be positioned as close as possible to the ball itself. If you can tie it directly under the ball itself and pull it very tight. If you still can move the string around afterward, it will loosen up later and deform. So loosen it and tie it up again.
Also, I used to tie off my heads facing away from me, this way I could tie the thread pulling it tight towards my body and the doll’s chin, avoiding the sausage head:
Et voilá – adieu, sausagehead! ;)
“Ghost Neck”
You could of course always model a small chin or create the doll with a neck to avoid the sausagehead. However, you should make sure the neck also has no wrinkles. A wrinkly doll neck is a sign of the so-called “ghost neck” (because it looks like the wrinkles on the neck of a simple ghost costume, where someone simply throws over a sheet which then is tied at the neck).
This unpleasant phenomenon can be avoided by cutting the jersey as narrowly around the throat/neck as possible. Then sew it with this little curve in the back just below the nape. Therefore no excess fabric should be able to pucker around the neck. The same things as to avoid the “sausage head”, also help against these dolls’ disease – you have to pull the fabric tight on the head and then tie off the head just below the chin just above the inner neck thread.
In addition, you should sitch the lower skin fabric to the so-called “muff”. This way the fabric will be tightly stretched to the bottom again avoiding wrinkles around the neck.
The latter, the muff, should also be worked firm enough to prevent the subsequent “dolls disease”:
“Bobblehead”
Wobbly heads are only funny when they are the ones on car dashboards.
With dolls, they are a serious “disease symptom” that needs immediate treatment. ; ) No – seriously, a doll wobbling its head around with every movement swinging back and forth, especially should this be recorded regularly, will not be a long joy. Such a shaky doll head can be especially annoying if the doll has heavy woolly hair. Or looking at the poor little doll that is being played with while bending its head away in all directions with every little movement. Not a pretty sight.
However, there are several different and proven solutions for this problem. First off it is advisable to work a kind of spine when creating the head. Add also shoulders to the muff/bead (the wool hanging out from the head down). The stability of the neck depends on how firmly the gauze or fabric is stretched and anchored downwards.
In addition, you can create a stable neck in the production of a ball head simply by felting the neck. It should be quite firm though. Also, try to keep the right proportions in mind – don’t let the neck get too thick so it does not match the head. But also make it thick enough to provide the stability needed. Again, the proportion and proportionality must still be given concerning the head.
Another solution may be to wrap a strip of wool into a roll firmly around the neck and add yarn tying the strip tight. This solid roll is then incorporated as a connecting piece between the head and body in the head and neck.
But you can also simply gather the rest of wool under the head and firmly wrap the yarn around in order to achieve more stability for the neck. In any case, you should always make the “wobble test” before sewing the doll’s head to the body: take the finished head holding on to the neck end, and wobble it slightly back and forth. You then can already see whether the head is sitting firmly on the neck or if it still tends to wobble around a lot. If the latter is the case you will have to work some more on its stability.
Conclusion
With all the reflections on proportions and the right way of working on a doll, at the end of the day, a doll above all is a heart project. So a doll with a “sausagehead” and wrinkled neck can be just perfect for one when made with love and care. And maybe therefore this imperfect one is even much more lovable than the most well-proportioned and perfectly crafted doll. In the end, it is one ‘s feelings for the doll and the heart that speaks to us when falling in love with a doll. Fortunately.


Hello Nat,
This is so so interesting.
Thank you for sharing .
Greetings,
Krystyna
Hey Krystyna,
thank you for taking the time and commenting and for your feedback. :)
goo to know, someone read the article and might find it helpful. I am always looking forward to sharing knowledge and discussing the oh so beloved topic of dollmaking. so if you got any suggestions or questions dont hesitate to write back. :)
heartly
Nat
Thanks for your reply.
Hello Nat,
Your post is absolutely helpful for me. Lots of sources, videos. Really great. Also your general notes on dolls and doll making give a wider perspective.
I could not quite understand the part releated to the so called “Ghost neck” which is very interesting.
I guess my Google translator could not cope with translating from German into English this time.
Best wishes,
Krystyna
Dear Krystyna,
glad there was something you could get out of the entries. ;)
sometimes blogging and not getting comments can be frustrating, as to thinking no one is reading all this anyway. hehe. tho i probably would write it here anyway. ;>
Maybe i will get around writing the english version of this post soon, too.
Also I would like try writing in both languages as often as i can anyway. :>
until then …
yours
Nat
ps: sorry fo using the word anyway so often. ;)
Ale super instrukcja.Taka wiedza to majatek.Pozdrawiam serdecznie