[:de]

Doll Making Tipps #1: Schnittmuster Puppe
Nachdem ich vor ewigen Zeiten gelernt habe, ganz klassische Waldorfpuppen zu nähen, war mir schnell klar, dass ich zwar gerne Puppen mache aber dazu lieber meine eigenen Schnittmuster entwerfen möchte. Mich hat nämlich für mein Verständnis immer hier und da noch etwas an der Puppe, beziehungsweise an dem ihr zugrundeliegenden Schnittmuster, gestört.
Ich verändere gerne immer wieder etwas – von Puppe zu Puppe, eben um dieser mehr gerecht zu werden. Denn wie auch wir uns (zum Glück) nicht alle gleichen, wie ein Ei dem anderen, trifft dies doch ebenso auch für handgemachte Puppen zu.
Trotzdem bin ich froh, dass ich damals gelernt habe, wie man so ein Schnittmuster für eine Puppe überhaupt grundlegend anlegt und “entwirft”, dann entsprechend variiert, usw.
Proportionen
An dieser Stelle also nun ein kurzer Exkurs zum Thema Puppenkörper-Proportionen-Schnittmuster:
Die Grundlage bei fast allen Waldorfpuppenschnitten ist das Rechteck*. Dann folgt noch ein wenig Mathematik …und der Rest ist Kreativität. ;)
(*Es gibt natürlich aber auch die Herangehensweise mit Kreisen bzw. dem “Pentagramm”, je nachdem welche Puppenart man fertigen möchte)
 Ganz grundlegend ist also für alle Puppen zu beachten, dass immer vom Kopf ausgegangen wird – d.h. die Kopfmaße bilden die Grundlage für alle weiteren Proportionen.
Der Körper vom Halsfaden bis zum Schritt entspricht etwa dem anderthalbfachen der Kopfhöhe.
Die Beine ebenfalls, aber exklusiv der Füße gerechnet. Ein Arm entspricht der zweifachen Kopfhöhe.

Der Kopf entspricht anders ausgedrückt einem Viertel der Gesamtkörperlänge.
Grob gesagt, sollten die Arme lose herabhängend nur bis in den Schritt reichen (je nach angestrebtem “Puppenalter”, da ältere Puppenkinder im Verhältnis zum Körper kleinere Köpfe haben) und hochgehoben über dem Kopf knapp den Scheitel berühren (jüngere oder Babypuppen reichen mit ihren Armen nur bis etwa zum oberen Kopfteil heran).
Die Fußspitzen sollten beim Hochklappen zum Gesicht die “Nasenspitze” der Puppe erreichen können.
Praktisch und mathematisch in Zahlen ausgedrückt heisst das alles also:
Gesetz dem Fall unser Puppenkopf ist
6 cm breit und 7 cm hoch,
dann müssen wir, um die Gesamtlänge des Körpers zu ermitteln, nur die Kopfhöhe mal drei nehmen, also 3 x 7 cm = 21 cm rechnen.
Unser Puppe wird dann später also insgesamt 28 cm groß sein.
Die Körperbreite – also von Schulter zu Schulter – entspricht zudem in etwa der Breite des Kopfes – hier also 6 cm.
Aber wie gesagt, leichte Abweichungen davon sind auch bei meinen Puppen durchaus erwünscht und gewollt, solange man nur die Grundlagen dazu kennt…
With all that said and in mind:
Das alles ist nur meine persönliche Macke – Ich lege eben für meine eigenen Puppen Wert auf diesen “Rahmen”.
Nicht zwingend notwendig zum Puppenmachen, aber doch gut zu wissen ist dieses Grundlagenwissen zu den Körperproportionen allemal (habe ich mich dazu nicht eh schon mal ausgelassen?).
Was aber jetzt nicht heisst, dass man sich ganz sklavisch daran halten muss. Ich variiere da selbst gerne und manche Puppen brauchen auch einfach längere Beine, kürzere Arme oder schmalere Schultern, oder…
Aber dieses Wissen im Hinterkopf zu haben, um eben dann und wann von der Norm abweichen zu können, ist schon nicht verkehrt. Mancher mag nämlich sonst enttäuscht sein, wenn eins mit viel Liebe und Mühe eine Puppe näht und dann feststellt, dass sie irgendwie “komisch” aussieht…nämlich weil die Proportionen nicht beachtet wurden und dann das fertige Werk vielleicht einem Äffchen eher ähnelt als einem Puppenkind. ;)
Was wiederum nicht heisst, dass diese Puppe weniger lieb gehabt werden wird. Vielleicht sogar eher im Gegenteil?!… Tja, Schönheit oder Perfektion liegt eben auch hier wie immer im Auge des Betrachters.
 [:en]
[:en]
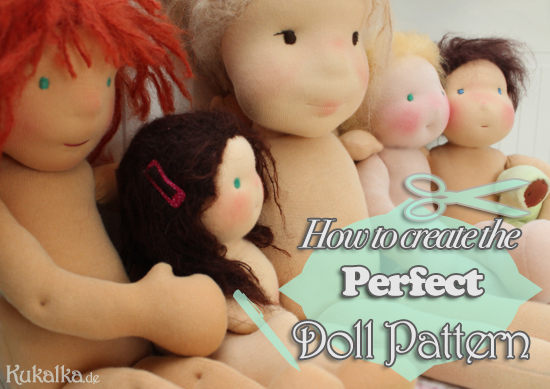
Doll Making Tips #1: doll patterns
I learned dollmaking some years ago, teached by a classic waldorf kindergarten teacher and dollmaker. I learned how to sew very traditional waldorf dolls. But I quickly realized, although loving this very traditional look and classic approach, I soon prefered to design my own patterns for my own dolls. I always wanted to change things up here and there, since I never was quite satisfied with the look – once I wanted to have bigger doll feet to fit the shoes better, then I would like to have a neck or shoulders for the doll I had in mind. So I had to take pen and paper and start from scratch, designing my own doll pattern. It took me quite some time, trial and error along with sewing and dismissing again, starting all over and cursing though. Eventually I achieved the look I wanted for my very own dolls. But nevertheless I am still on my own journey to the perfect doll pattern (since I tend to get restless quite quickly and start adding and changing things up again).
But I am glad that I was able to learn the very basics on dollmaking and cloth dolls from my dear teacher so many years ago, since I then was able to switch things up and making my own doll pattern just my way…
Proportions
So at this point I would like to share my knowledge and write a short summary on the subject of doll body proportions patternwise: The basis of almost all waldorf dolls body pattern is the rectangle*.
Then add a little math … and the rest is creativity. ; )
( *Note: There of course also exist some different approaches to it, like the one with circles or the “pentagram” one, depending on what type of doll you want to customize. )
It almost always starts with the head – you have to take the head measurements first, since all other proportions are based on the heads size. The length of the body, measured down the neck thread to the crotch, corresponds one and a half times the heads height.
The legs also, but excluding the feet (they are added up extra).
And an arm then is twice the length of the head.
In other words; The head corresponds one-quarter of the total body length.
Broadly speaking, the arms should end on the level of the crotch when loosely hanging down (this can vary a little, depending on the sought “dolls age”, since dolls representing older children tend to have smaller heads in relation to the whole body). Lifted up above the head the hands should come together above the vertex nearly touching (again, dolls representing younger ones or baby dolls have shorter arms, resulting in them not being able to bring the hands together above their head but rather ending somewhere above ear level).
The toes should be able to reach the nose when bending the legs up.
Practical and mathematically expressed in figures, this means ie:
Let’s assume our doll’s head is 6 cm wide and 7 cm tall. We then want to first determine the total length of the body. In order to do so we just multiply the heads height three times: 3 x 7 cm = 21 cm.
So our doll will be 28 cm total in size (body and head) later.
The body width – ie from shoulder to shoulder – also corresponds approximately the width of the head – in this case it here means 6 cm.
But as I said before, slight changes and variations thereof are also entirely desirable and wanted when trying to achieve a certain look for your doll, as long as one keeps the basics of proportions in mind…
With all that said and in mind:
All this is just my personal point of view – I create my own dolls and their patterns on this “framework”. It in no way is mandatory for doll making, but in my opinion it is good to know this basic knowledge about the body and dolls proportions (Haven’t I already blogged about this plenty before?).
All this in no way means you have to stick to every bit of it now. In fact I varied up and ventured from this given basics quite some time myself – some dolls simply need to have slightly longer legs, shorter arms or narrower shoulders, or… But to have this knowledge on proportions in mind in order to then change things up now and then or deviate from the norm can be very handy.
Not knowing this simple given facts about human/doll body proportions can result in disappointment – ie if one sews a doll with a lot of love and effort only to then notice that the doll somehow has a “weird” look about it … namely because the proportions were ignored and then the finished doll maybe looking more like a little monkey having way too long arms. ;)
Which in turn does not mean that this doll will be loved less. Maybe even the opposite?! Don’t we like the others little flaws and imperfections even more so making them more human and likeable to us?
Well, I guess it is true what they say – beauty or perfection always lies in the eye of the beholder. This may perhaps apply even more so for dolls.
What do you think?!…
[:]


Great information, Thanks!
Thank you. Glad if you found it helpful. ;)
Vielen Dank für die superguten Tipps!! Ich wage mich gerade an meine erste Puppe für meine Tochter…
Liebe Anne,
vielen Dank für Deinen Kommentar! Ich feue mich, dass Dir meine Tipps weiter helfen konnten. Viel Freude beim Abenteuer Puppenmachen wünsche ich Dir. Deine Tochter freut sich sicher, weil sie die Liebe spüren wird, mit der ihre Puppe gemacht wurde!
Herzliche Grüße
Nat