→ English version below
Oft bekomme ich von ambitionierten Puppennähbegeisterten oder angehenden PuppenmacherInnen die Frage gestellt, wie man ein eigenes Puppen Schnittmuster entwirft!?…
Ein wenig dazu habe ich ja bereits in diesem Blogpost hier geschrieben. Dabei ging es vor allem um Proportionen. Deren Einhaltung ist ein wichtiger Faktor beim Schnittmusterentwurf von Puppen.
Trotzdem erreichten mich auch weiterhin Fragen danach, wie man denn nun konkret ein Puppen-Schnittmuster entwirft.
Puppenschnittmuster entwerfen
Da neben Proportionen auch Symmetrie ein weitere wichtiger Punkt ist, der berücksichtigt werden will, wenn man ein eigenes Puppenschnittmuster erstellt, möchte ich daher einmal ausführlicher auf eine einfache Technik dazu eingehen.
Zudem möchte ich meine allgemeine Herangehensweise und mein Vorgehen dabei mit Euch teilen…
Ob es da einen allgemeingültigen Weg gibt, wie man Puppenschnittmuster selbst entwirft, wage ich zu bezweifeln. Jede Puppenmacherin hat da sicher über die Jahre ihre eigene Technik entwickelt, die für sie selbst und ihre Art Puppen am besten funktioniert.
Daher kann ich hier natürlich auch nur erklären wie ich es angehe, wenn ich ein neues Puppenschnittmuster entwerfe und die Idee einer Puppe, die mir im Kopf herumgeht verwirklichen möchte…
Mein Weg: Inspiration & Skizzen
Meist habe ich schon ein Bild, eine grobe Idee davon, was für eine Puppe ich überhaupt machen möchte – Inspiration ist die Grundlage.
Während der schönen warmen Sommersonnentage verbrachten wir jüngst z.B. viel Zeit am Wasser… Ich habe eigentlich immer einen Block und Stifte dabei, um so schnell Eindrücke, Momente, Gedankenbilder und Ideen festzuhalten. Daher war Wasser in dem Moment die Inspiration und so die Idee für ein “Wasserwesen” natürlich nicht weit.
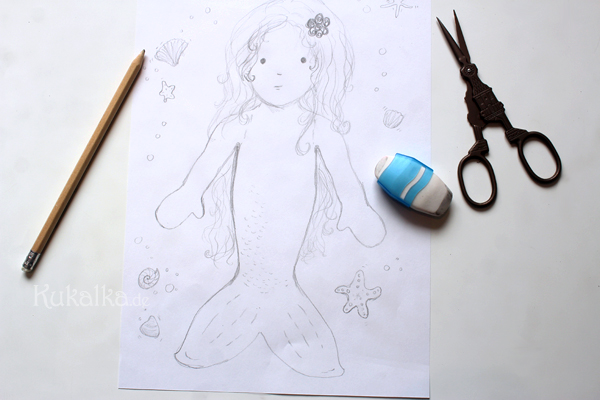
Ein erstes Gedankenbild, eine Situation oder Idee ist also meist meine Grundlage für eine neue Puppe. Ich skizziere so zunächst eine Stimmung, einen Gedanken, eine Momentaufnahme – versuche das Bild davon aus meinem Kopf zu Papier zu bringen.
Meermädchen
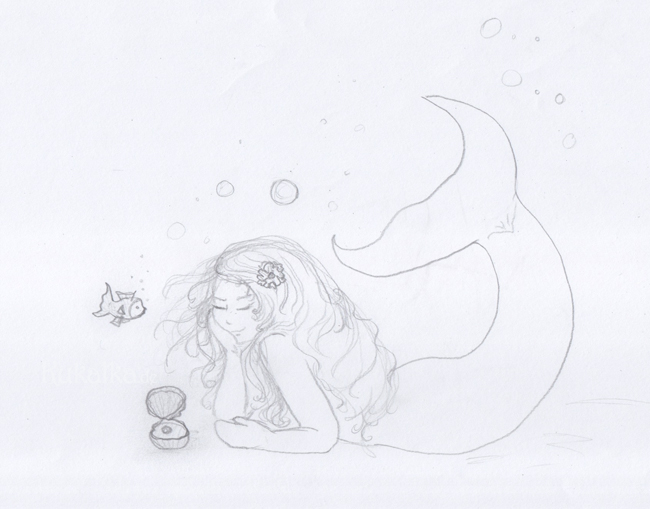
Oft mache ich noch einige weitere Skizzen, …später dann auch schon davon wie meine fertige Puppe evtl. aussehen könnte.
Das muss weder perfekt noch schön sein, es soll einfach die Idee und den Ausdruck weiter festhalten.

So visualisiere ich meine Puppe und lasse sie immer weiter konkrete Form annehmen.

Dann folgt eine Phase von noch mehr Skizzen, die auch schon verschiedene Perspektiven oder Details festhalten können.
Wenn es aber eine einfache Puppe (wie in meinem Beispiel hier dieses “Meermaid”-Püppchen) werden soll, dann reichen meist eine oder zwei Skizzen schon aus.
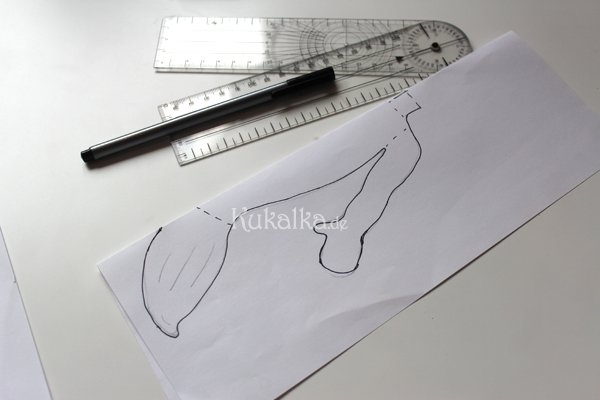
Diese erste Skizze in Originalgröße zeigt zudem gleich schon die Proportionen und Kopfkugelgröße, welche die Puppe haben muss.

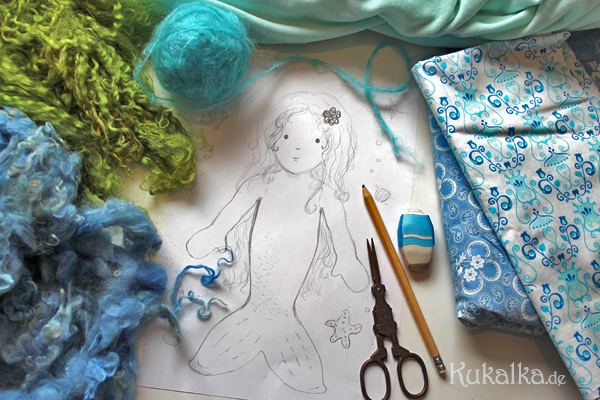
Eventuell mache ich mir auch schon Gedanken zu möglichen Stoffen und Materialien, die ich für die Puppe verwenden könnte.
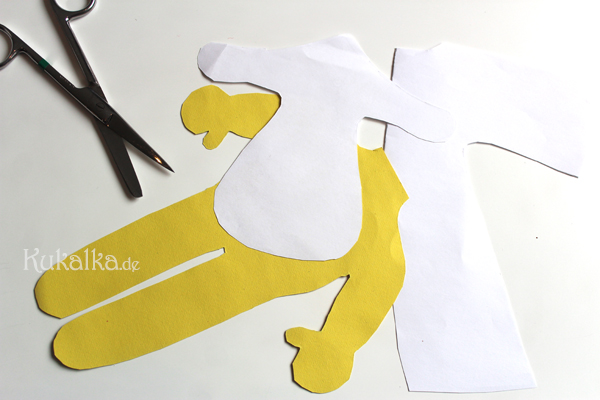
Reinzeichnung: Puppenkörper Schnittmuster zeichnen
Danach kommt dann auch schon die erste “Reinzeichnung”:
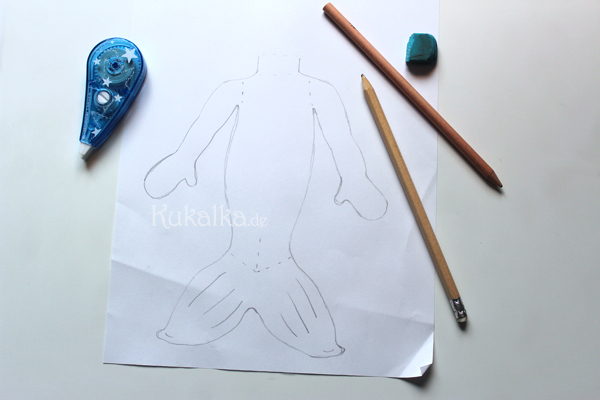
Man zeichnet also nun den Puppenkörper – möglichst schon in der richtigen Größe, den er später auch haben soll – sauber auf ein Blatt Papier auf.
Das Problem, welches sich an dieser Stelle oft ergibt ist, dass wahrscheinlich (auch wenn man sich noch so sehr bemüht) beide Seiten zumindest minimal verschieden sein werden. Bei manchen Puppenschnitten ist dies nicht so wichtig oder gar gewollt. In der Regel aber bemühe ich mich auch bei einer Puppe um Symmetrie und gleichmäßige Proportionen. Dem menschlichen Auge und unserer Wahrnehmung gefallen nämlich Gleichmäßigkeit und Symmetrie am besten und wir empfinden dies somit als “schön”.
Würden wir also jetzt den vorgezeichneten Puppenkörper einfach so ausschneiden und als Schnittmuster verwenden, wäre alles etwas unsymmetrisch, was eventuell später bei der fertig genähten Puppe unschön aussehen könnte.
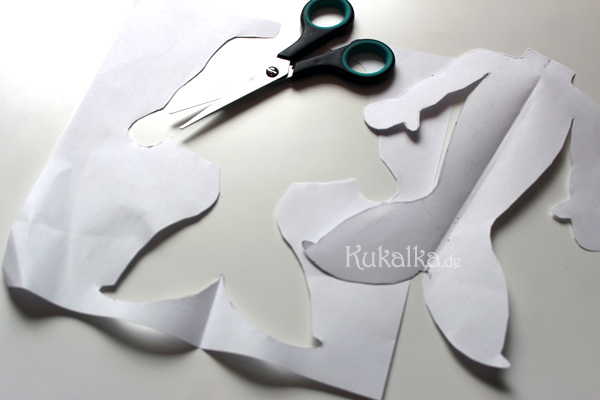
Symmetrie: Blattfalt-Technik
Für unsere Meermädchenpuppe bedeutet dies also, dass wir das Blatt jetzt zunächst genau in der Mitte des aufgezeichneten Körpers falten. Wir haben unsere Puppe “halbiert”.
Die Seite, welche uns besser gefällt wird nun unsere Schnittmustervorlage.
An ihr orientieren wir uns nun, wenn wir den halbierten Umriss ausschneiden.
Man sollt hier möglichst genau an der vorgezeichneten Linie schneiden (Die gefaltete Mitte wird dabei nicht durchschnitten!).
Faltet man dann das Blatt nämlich wieder auf, hat man auch schon eine symmetrische Vorlage für das einfache Puppenkörper Schnittmuster.
Es kann sein, dass man nun hier noch mal nachbessern muss.
Mir z.B. war die erste Version noch etwas zu breit. Also habe ich sie noch mal aufgezeichnet, diesmal etwas schmaler und dann wiederum gefaltet und ausgeschnitten.
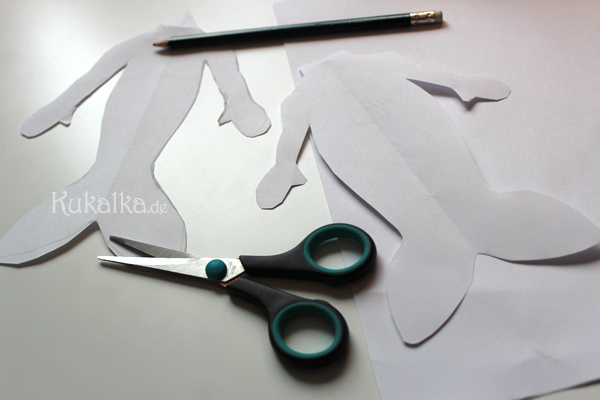
Der so schließlich gleichmäßige ausgeschnittene Puppenkörperschnitt wird ein letztes mal sauber übertragen. Das bedeutet, damit man später mit dem Schnittmuster auch arbeiten und es mehrmals als Vorlage nutzen kann, sollte es auf ein festere Stück Papier oder Pappe gelegt und noch einmal mit einem Stift sauber umrissen werden.
Dieser letzte Reinentwurf ist somit nun unser fertiges Körperschnittmuster für das Meerjungfrauenpüppchen.
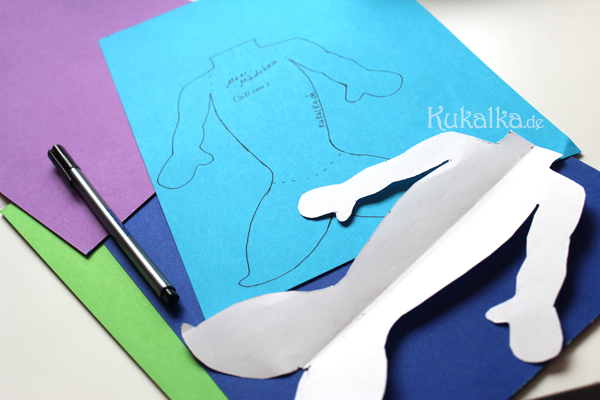
Et voilá: Wir haben unser Meermädchen – Puppenkörperschnittmuster erstellt.

Dieses ist nun auch schon unsere Vorlage zum Nähen. Es ist symmetrisch und proportional.
Man kann die Vorlage für den Puppenkörper nun noch laminieren, damit sie etwas langlebiger und stabiler wird.
Nach diesem Prinzip kann man für alle einfachen Puppenkörper Schnittmuster verfahren.
Es macht also keinen Unterschied, ob die Puppe Fischschwanz oder Beine haben soll. Die Technik für solch einfache Puppen, deren Körper aus einem Stück genäht wird, bleibt die gleiche. ;)
Wie gesagt – das ist nur die Art wie ich selbst meine (einfachen) Puppenschnitte erstelle.
(Übrigens: Andere Schnittmuster z.B. die für Puppen mit eingesetzten Gliedern werden wiederum etwas anders, nämlich mit Hilfe von ein wenig Mathematik (keine Angst- es ist ganz simpel) erstellt- falls ihr auch daran Interesse habt, schreibt das gern die Kommentare und ich erkläre dann gerne in einem weiteren Blogpost mehr dazu…!)
Es mag viele Puppenmacherinnen geben, die da ganz anders vorgehen. Einige nähen vielleicht gleich so darauf los und es funktioniert auch ganz wunderbar. Andere gehen es bestimmt wieder ganz anders an. Und einige, wie ich auch, machen vielleicht erst einmal nur eine odere mehrere Skizzen und arbeiten auch mit oben beschriebener “Blattfalttechnik”.
Wie auch immer man vorgeht, wichtig ist dabei schließlich den eigenen Weg zu finden, der für einen selbst und die Puppen gut funktioniert…
PS:
Und da wir nun schon einmal ein kleines Meermädchen – Schnittmuster entworfen haben, können wir auch gleich ein Püppchen damit machen…
Daher gibt es hier im Blog demnächst das Schnittmuster zum Download zusammen mit einem Mini-DIY, in dem wir unsere Püppchen zusammen nähen werden.
(-> Folgt mir einfach auf Instagram oder Facebook, wenn ihr rechtzeitig dazu informiert werden wollt!)

→ English version :
One of the most asked questions I am getting via mail is (along with how to needle sculpt a doll face) the one about how to design your own doll pattern.
I already wrote a blogpost on this subject here some time ago. The main focus of the post was on proportions. Their adherence is important and should be kept in mind when designing a doll pattern. Nevertheless, I still had questions about how to design a doll pattern coming in.
How To: Doll Pattern
Because apart from proportions, symmetry is another important point that needs to be taken into account when you create your own doll pattern, I would like to go into detail of a simple little dollmaking technique. In todays blog post I would also like to share my general approach when making dolls and designing a pattern with you …
I dare to doubt whether there’s a “right” way to design doll patterns. I am sure every dollmaker has certainly developed her own technique over the years. One which works best for her and her kind of dolls. Therefore, as far as I am concerned, I only can explain how I go about things when I create a new doll’s pattern and how I try to bring to life the idea of a doll (that has been running through my head sometime now)…
My Way: Inspiration & Sketches
Usually, I have a “picture” in mind, a rough idea of what kind of doll I want to make – Often inspiration from my everyday life is the basis.
We spent the warm June summer days being outside and spending quite some time at sea… I made a habit out of always having paper and pens on me, just to be equipped to capture impressions, moments, thoughts, and ideas. Therefore water was the inspiration at the time and so the idea of this kind of doll was not far off.
A first idea, a situation, emotion, or thought is usually my basis for a new doll. Often I am trying to sketch a mood, a memory, an image in my mind, a snapshot – I just try to get the picture out of my head and on paper.
Mermaiden
Often I then do even more sketching, I try to grab the idea and manifest it more…
Later on, I started trying to sketch down how my finished doll might look. It does not have to be perfect or beautiful, it just has to capture the idea and the expression for me.
This is how I visualize my doll and let her take on a more concrete appearance.
This is followed by a phase of even more sketches. They can already show different perspectives or details (especially, when planning on making the dolls clothes).
But if it is a rather simple doll (without a wardrobe and with a simple body type, just as in my example here the mermaid doll is supposed to be), then usually one or two sketches are already sufficient.
I then try to make the very first doll sketch in its original size. This way I can also check the proportions and head size that the doll will later on have.
Maybe creating this first image I also already had in mind some materials that I could use for the doll.
Drawing the Doll Body Pattern
After this step comes the first “clean drawing”: I now draw the doll’s body neatly on a sheet of paper – ideally already in the actual size, which the doll will be.
The problem facing at this point is both sides will differ minimally at least (even if you are trying hard to draw symmetrically). For some doll, this may not be a problem at all or may even be wanted. However, I mostly strive to achieve symmetry and harmony of proportions in a doll. For the human eye and our perception, harmony, and symmetry are better perceived and therefore inherit “beauty”.
So if we were just to cut out this drawn doll body and use it as a pattern, the doll probably would turn out to be somewhat unbalanced, which might then look “off” in the finished sewn doll.
Symmetry: The Sheet folding technique
So this means that we now instead fold the sheet exactly at the center of our previously drawn body. We bisect our doll so to say. The side of the half, which you like better, will now be the primary pattern template.
We now look at the half we chose when we cut along the outline. You should cut as precisely as possible on this line (do not cut the folded center!).
Unfolding the sheet then again, you have now got an already symmetrical template as a doll pattern.
You may have to modify it a bit until you are stratified with the final look of the pattern piece.
My first version was still a bit too wide for my liking. So I had to draw it again, this time a bit narrower – then again fold it and cut it out.
Finally, the cut-out doll body is transferred one last time. To be able to work with the pattern later on and use it many times as a template, it should be transferred on a firmer piece of paper or cardboard.
This last clean design is now the finished body pattern piece for the doll.
Et voilá: We have created our own (mermaid) doll body pattern from scratch!
This now is our original pattern for sewing dolls. It is symmetrical and proportional.
You can now also laminate the template for the doll’s body to make it more durable and stable.
Following this technique, you can create different patterns for all the simple doll types. It also makes no difference whether the doll should have a fishtail or legs. The technique for this simple doll, whose body is sewn from one piece, remains the same. ;)
As said before – this is the way I create my doll patterns for the more simple dolls.
(By the way: Other patterns, for example, the dolls with inserted limbs are again a somewhat different subject. I do create those with the help of a little mathematics (no fear – it is quite simple still) – So if you are interested in hearing about it, write so in the comments and I will then maybe explain further in a later blog post…!)
There may be a lot of dollmakers who are creating their patterns quite differently. Some may sew it right on and it also works wonderfully for them. Others are maybe going at it quite differently. And some, like me, maybe draw one or more sketches and then also work with the above-described “sheet folding technique”. ;)
Whatever path you choose to go, above all techniques it is important to find your unique way on this creative journey, one that will work well for you and the dolls you will create …
PS:
And since I have already created this small mermaiden doll pattern, we can now as well make a doll from it … This is the reason why the pattern will be available for download here on the blog along with a mini DIY in which we will sew this doll together, soon.
(-> Simply follow me on Instagram or Facebook, if you do not want to miss out on this!)
;)


